
Running dbt with Airflow
How to setup and run dbt with airflow on your local machine.
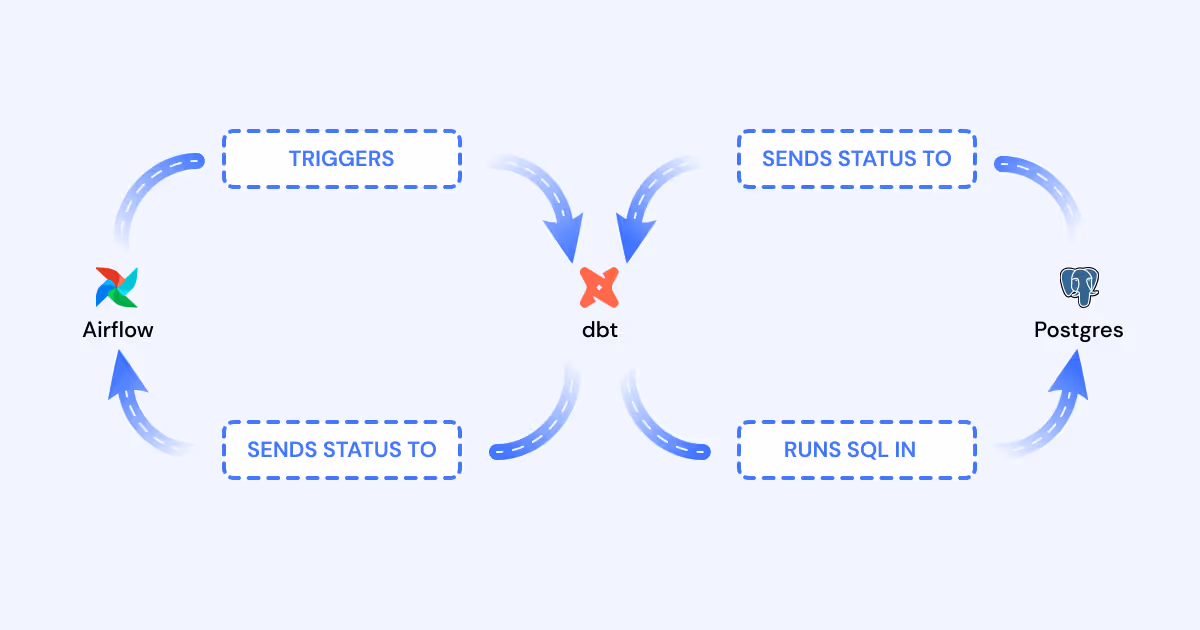
Apache Airflow is a platform for writing, scheduling, and monitoring workflows. It provides a central location to list, visualize, and control every task in your data ecosystem. It also has an intuitive task dependency model to ensure your tasks only run when their dependencies are met.
Airflow doesn’t just schedule SQL scripts. It has an expansive library of “Operators” that can make HTTP requests, connect to servers via SSH, and even run pure Python. Because of its flexibility, Airflow’s role is often not clearly understood, but its true value lies in its ability to orchestrate (trigger) every step of the data pipeline.

If you’re familiar with dbt, you know that dbt Cloud can schedule your models and tests, run them in the right order, and notify you when they fail, all without Airflow. But here’s what Airflow integration offers:
Global Task Dependency
Understand how software tasks, dbt tasks, and visualization layer tasks relate to each other.

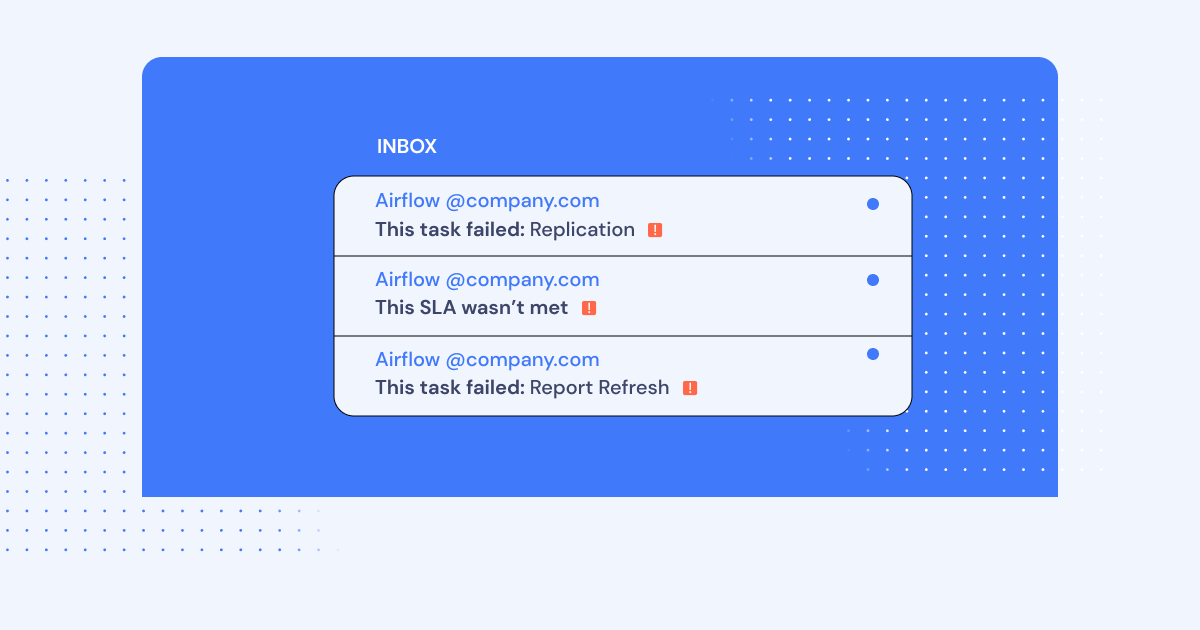
Centralized control and alerting for the entire Data Pipeline
Orchestrate tasks across systems and see where steps and tests fail.
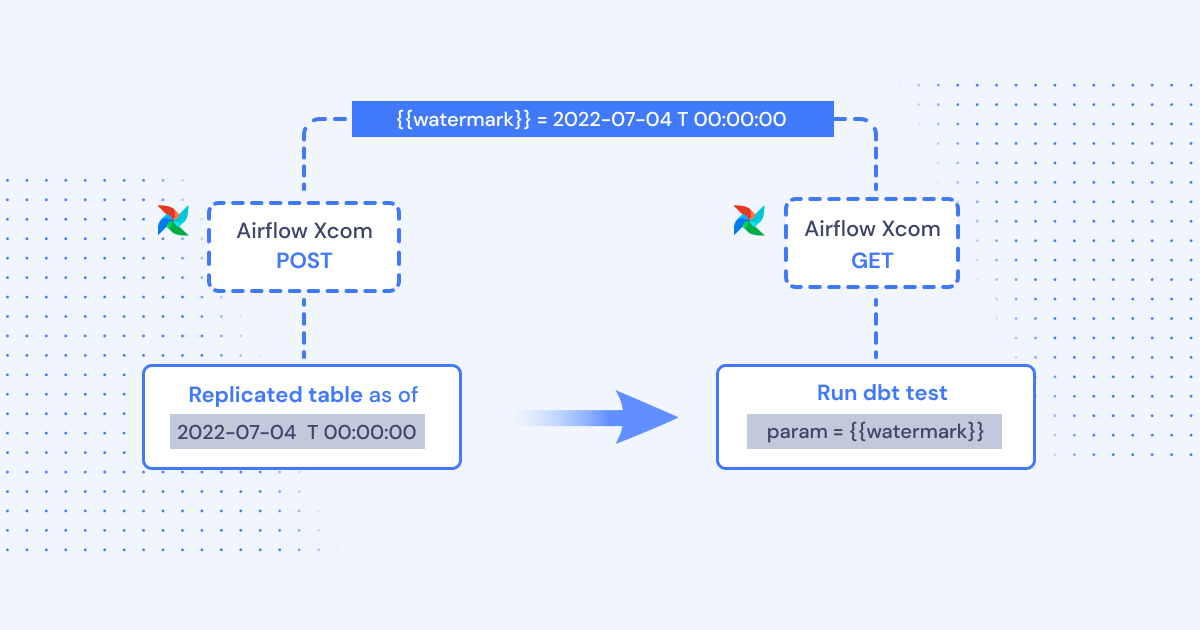
Task parameterization across systems
The results of one process outside of dbt (like the watermark of a data replication process) can be extracted and injected as a parameter into a dbt run (dbt supports injectable parameters)
To help you see exactly what it looks like to integrate dbt into Airflow, we put together some technical instructions on how to build a local demo.
Note: Don’t be intimidated by the length of this article. On the contrary, we do our best to explain what’s going on for readers that might not be familiar with software engineering.
How to setup dbt and Airflow overview
In this demo, we’re going to install a mix of command line tools and Python applications.
First, we’ll install and run Postgres with Docker. Then, we’ll install dbt, walk through the configuration, and run some of the test models that come with a fresh project. After that, we’ll install Airflow and write a DAG that can run all of your models and tests independently.
When everything is finally stitched together, we’ll trigger the DAG to run and verify that everything worked! And it should look something like this:

Project Folder
Note: This demo relies heavily on Shell commands. Code snippets that start with a dollar sign ($) are Shell commands that should be run in a terminal. However, when running those commands, omit the leading “$”. This is just a convention to help you know where they start.
Open a terminal.
In your home directory, make a folder called repos
$ mkdir ~/reposDeveloping applications from the repos folder is a common practice for software engineers. It helps keep their code bases organized.
In ~/repos, make a folder called demo. This is where we’ll build and configure our demo.
$ mkdir ~/repos/demoClose this terminal.
$ exitSetup Postgres
We’ll use Postgres as our central analytics database. Typically, you would use a database better suited for big data like Snowflake or Redshift, but Postgres is free and easy to run.
Location
Open a new terminal. We will use this terminal exclusively for Postgres.
Note: Many terminal programs let you make multiple tabs and name them. If you can, name this terminal Postgres for your own convenience.
In ~/repos/demo, create a folder called postgres:
$ mkdir ~/repos/demo/postgresThis folder will contain installation and configuration for Postgres.
Installation
We could install and configure Postgres directly on your machine. But installing and configuring databases manually is complex. We can avoid that complexity by running Postgres in a “container”. Containers are a Linux feature that lets you run programs in an isolated environment, similar to a virtual machine (i.e. running Windows inside MacOS). Furthermore, they are easy to install, uninstall, and run, much like mobile apps.
To run containers on your machine, download and install Docker Desktop. If you’re running Linux, consult the official documentation for installing Docker Engine and Docker Compose. Once you finish the install, start Docker Desktop.
Create a file in ~/repos/demo/postgres named docker-compose.yaml. In this file, we’ll write some configuration that makes Docker spin up an instance of Postgres.
$ cat  ~/repos/demo/postgres/docker-compose.yaml
version: '3'
services:
  dw:
    image: postgres:14-alpine
    ports:
      - 5000:5432
    environment:
      POSTGRES_DB: dw
      POSTGRES_USER: dw_user
      POSTGRES_PASSWORD: dw_password
EOF
Note: This is all one Shell command!
This configuration tells Docker to:
- Download a pre-built Postgres image
- Make Postgres available on port 5000
- Create a database named “dw”
- Create a user named “dw_user”
- Set the password to “dw_password”
Starting Postgres
Your demo folder should now look like this:
demo
└── postgres
└── <span class="code">docker-compose.yaml</span>To start Postgres, run:
$ cd ~/repos/demo/postgres && docker-compose up -dYou should see output that looks like this:
user@computer:~/repos/demo/postgres$ docker-compose up -d
Creating network "postgres_default" with the default driver
Creating postgres_dw_1 ... done
To verify that the container is running, run:
$ docker container 1sYour should see an output that looks like this::
user@computer:~/repos/demo/postgres$ docker container ls
CONTAINER ID   IMAGE  	  COMMAND              	 CREATED      	  STATUS      	  PORTS                                   	  NAMES
d035aec9b754   postgres   "docker-entrypoint.s…"   45 seconds ago   Up 43 seconds   0.0.0.0:5000->5432/tcp, :::5000->5432/tcp   postgres_dw_1
Later, you can turn off Postgres by running this command (but not yet!):
$ cd ~/repos/demo/postgres && docker-compose down
Leave this terminal open. We’ll use it later.
Setup Python
For this demo, we will not be running dbt or Airflow in containers like we did with Postgres. The open-source version of dbt is a command-line tool. If we ran these apps in containers, the only way Airflow could run dbt-CLI commands would be to connect the Airflow container to the dbt container over SSH. SSH communication across containers is a complex topic and requires extra configuration in both Airflow and Docker. For this reason, dbt and Airflow will be installed directly on your machine.
Virtual Environments
If you’ve used an iOS or Android device, you might intuit that mobile apps are self-contained. For example, even if the Lyft and Uber apps both use a few of the same libraries, they *don’t *share those libraries from some shared location. The app contains everything it needs, even if this means every app on the device has a copy of the same library.
dbt and Airflow are Python Packages, and **Python Packages do not work like mobile apps. **Mobile apps are compiled into a single binary file, whereas Python packages are a collection of text files. You need extra software to manage the shell environment for package dependencies. For this demo, we will use Pyenv to install Python, and Pyenv Virtualenv (an extension of Pyenv) for managing Python Virtual Environments.
Note: Sometimes you can get away with not using virtual environments. However, Airflow v2.3.2 and dbt v1.1.0 have conflicting libraries, so you have to follow best practices for this demo.
Installation
Open a new terminal.
The preferred installation method for pyenv and pyenv-virtualenv is brew. To install brew, run:
$ /bin/bash -c "$(curl -fsSL https://raw.githubusercontent.com/Homebrew/install/HEAD/install.sh)"
Note: This may ask for sudo access. Also, because brew installs a lot of software from source, the installation may take a while.
Now that we have brew, we can install Pyenv and Pyenv Virtualenv:
$ brew install pyenv
$ brew install pyenv-virtualenv
After the installation, we’ll need to add a couple of things to our Shell profile.
If you’re in MacOS, run the following:
$ echo 'eval "$(pyenv init -)"' >> ~/.zshrc
$ echo 'eval "$(pyenv virtualenv-init -)"' >> ~/.zshrc
If you’re in Linux, run the following:
$ echo 'eval "$(pyenv init -)"' >> ~/.bashrc
$ echo 'eval "$(pyenv virtualenv-init -)"' >> ~/.bashrc
Note: In MacOS, the default Shell is Zsh, and its profile is located at ~/.zshrc. In Linux, the default Shell is Bash, and its profile file is located at ~/.bashrc. Every time you start a terminal, the shell runs those files to initialize the shell environment. The two commands you added initialize pyenv and pyenv-virtualenv when you start terminal.
Now, close your terminal and open a new one. Make sure pyenv works by running:
$ pyenv -vFinally, let’s install Python. For this tutorial, we will be using version 3.10.4. To install, run:
$ pyenv install 3.10.4Once Python has successfully installed, close this terminal.
Setup dbt
Open a new terminal. We’ll use this one exclusively for dbt.
Location
In ~/repos/demo, create a folder named dbt:
$ mkdir ~/repos/demo/dbtThis folder will contain installation and configuration files for dbt.
Virtual Environment
We need to install dbt in a virtual environment. This will prevent library conflicts with other Python packages on your machine.
Create a new virtual environment named demo_dbt:
$ pyenv virtualenv 3.10.4 demo_dbtYou can configure Pyenv Virtualenv to automatically activate and deactivate demo_dbt when entering or leaving ~/repos/demo/dbt, respectively. To do this, run:
$ cd ~/repos/demo/dbt && pyenv local demo_dbtTo confirm that demo_dbt is the active virtual environment, run:
$ pyenv versionIf the output says demo_dbt, your virtual environment is active! Now, anything you install via pip (Python’s package manager) will be installed in the virtual environment, and it will only be accessible when the virtual environment is active.
Installation
To install dbt, run:
$ pip install dbt-postgres==1.1.0
Note: You may get an error that psycopg can’t be built because it’s missing libpq-dev.
- On Mac, you can install it via brew: brew install postgresql
- On Ubuntu, you can install it via apt: sudo apt install libpq-dev Rerun pip install dbt-postgres. The installation should complete successfully now.
Configuration
dbt needs a project to work with. Let’s initialize the skeleton of a project.
To initialize your project, run:
$ cd ~/repos/demo/dbt && dbt init
The init script will prompt you for a couple things:
-
For project name, use my_project.
-
For database, read the prompt. Make whatever entry is needed for postgres. If it asks you for connection info, use the credentials from Postgres:
-
Database: dw
-
Username: dw_user
-
Password: dw_password You now have a boilerplate project in ~/repos/demo/dbt/my_project.
At this point, your demo folder should look like this:
├── dbt
│ ├── logs
│ │ └── dbt.log
│ └── my_project
│ ├── README.md
│ ├── analyses
│ ├── dbt_project.yml
│ ├── macros
│ ├── models
│ │ └── example
│ │ ├── my_first_dbt_model.sql
│ │ ├── my_second_dbt_model.sql
│ │ └── schema.yml
│ ├── seeds
│ ├── snapshots
│ └── tests
└── postgres
└── docker-compose.yaml
if dbt init didn’t ask for credentials to Postgres, you’ll need to set those credentials manually. dbt stores this information in ~/.dbt/profiles.yml. Let’s populate it:
cat  ~/.dbt/profiles.yml
my_project:
    outputs:

      dev:
        type: postgres
        threads: 1
        host: localhost
        port: 5000
        user: dw_user
        pass: dw_password
        dbname: dw
        schema: dev

      prod:
        type: postgres
        threads: 1
        host: localhost
        port: 5000
        user: dw_user
        pass: dw_password
        dbname: dw
        schema: prod

    target: dev
EOF
Note: This is all one Shell command!
This will configure dbt to connect to Postgres, where it can run SQL and build our DW tables!
To test whether (1) the project is structured properly, and (2) the database connections are working, run:
$ cd ~/repos/demo/dbt/my_project && dbt debug
Your output should look like this:
user@computer:~/repos/demo/dbt/my_project$ cd ~/repos/demo/dbt/my_project && dbt debug
23:40:31  Running with dbt=1.1.0
dbt version: 1.1.0
python version: 3.10.4
python path: /home/user/.pyenv/versions/3.10.4/envs/demo_dbt/bin/python3.10
os info: Linux-5.13.0-48-generic-x86_64-with-glibc2.31
Using profiles.yml file at /home/user/.dbt/profiles.yml
Using dbt_project.yml file at /home/user/repos/demo/dbt/my_project/dbt_project.yml

Configuration:
  profiles.yml file [OK found and valid]
  dbt_project.yml file [OK found and valid]

Required dependencies:
 - git [OK found]

Connection:
  host: localhost
  port: 5000
  user: dw_user
  database: dw
  schema: dev
  search_path: None
  keepalives_idle: 0
  sslmode: None
  Connection test: [OK connection ok]

All checks passed!
Sample Model
Take a look in ~/repos/demo/dbt/my_project/models. You should see an example folder with a couple sample models:
my_project
├── README.md
├── analyses
├── dbt_project.yml
├── logs
│ └── dbt.log
├── macros
├── models
│ └── example
│ ├── my_first_dbt_model.sql
│ ├── my_second_dbt_model.sql
│ └── schema.yml
├── seeds
├── snapshots
└── tests
These sample models are included every time you initialize a project. They’re meant to be something simple you can run to try out dbt. Take a look at the .sql files.
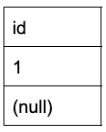
- my_first_dbt_model.sql produces a table wth one column and two rows:
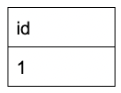
- my_second_dbt_model.sql produces a table wth one column and one rows:
dbt run
To run these example models, run:
$ cd ~/repos/demo/dbt/my_project && dbt runYour output should look like this:
user@computer:~/repos/demo/dbt/my_project$ cd ~/repos/demo/dbt/my_project && dbt run
00:52:06  Running with dbt=1.1.0
00:52:06  Found 2 models, 4 tests, 0 snapshots, 0 analyses, 167 macros, 0 operations, 0 seed files, 0 sources, 0 exposures, 0 metrics
00:52:06
00:52:06  Concurrency: 1 threads (target='dev')
00:52:06
00:52:06  1 of 2 START table model dev.my_first_dbt_model ................................ [RUN]
00:52:06  1 of 2 OK created table model dev.my_first_dbt_model ........................... [SELECT 2 in 0.08s]
00:52:06  2 of 2 START view model dev.my_second_dbt_model ................................ [RUN]
00:52:06  2 of 2 OK created view model dev.my_second_dbt_model ........................... [CREATE VIEW in 0.03s]
00:52:06
00:52:06  Finished running 1 table model, 1 view model in 0.18s.
00:52:06
00:52:06  Completed successfully
00:52:06
00:52:06  Done. PASS=2 WARN=0 ERROR=0 SKIP=0 TOTAL=2
Let’s verify that these models actually made tables in our database. Switch over to the postgres terminal so we can run some SQL commands.
First, let’s check if my_first_dbt_model.sql produced a table:
$ cd ~/repos/demo/postgres && docker-compose exec dw psql -U dw_user
-d dw -c 'SELECT * FROM dw.dev.my_first_dbt_model;'
Your output should look like this:
 id
----
  1

(2 rows)
Note: psql displays NULL values as blank by default.
Next, let’s check if my_second_dbt_model.sql produced a view:
$ cd ~/repos/demo/postgres && docker-compose exec dw psql -U dw_user
-d dw -c 'SELECT * FROM dw.dev.my_second_dbt_model;'
Your output should look like this:
 id
----
  1
(1 row)
If your output looks correct, that means everything is working.
Go ahead and switch back over to the dbt terminal.
dbt test
A great feature in dbt is built-in Unit Testing. You can test things such as:
- Are all values for a column unique? (such as for a primary key)
- Are all values for a column not null?
The sample tests live in
~/repos/demo/dbt/my_project/models/example/schema.yml.To run these tests, run:
$ cd ~/repos/demo/dbt/my_project && dbt testYour output should look like this:
user@computer:~/repos/demo/dbt/my_project$ cd ~/repos/demo/dbt/my_project && dbt test
00:56:12  Running with dbt=1.1.0
00:56:12  Found 2 models, 4 tests, 0 snapshots, 0 analyses, 167 macros, 0 operations, 0 seed files, 0 sources, 0 exposures, 0 metrics
00:56:12
00:56:12  Concurrency: 1 threads (target='dev')
00:56:12
00:56:12  1 of 4 START test not_null_my_first_dbt_model_id ............................... [RUN]
00:56:12  1 of 4 FAIL 1 not_null_my_first_dbt_model_id ................................... [FAIL 1 in 0.06s]
00:56:12  2 of 4 START test not_null_my_second_dbt_model_id .............................. [RUN]
00:56:12  2 of 4 PASS not_null_my_second_dbt_model_id .................................... [PASS in 0.01s]
00:56:12  3 of 4 START test unique_my_first_dbt_model_id ................................. [RUN]
00:56:12  3 of 4 PASS unique_my_first_dbt_model_id ....................................... [PASS in 0.02s]
00:56:12  4 of 4 START test unique_my_second_dbt_model_id ................................ [RUN]
00:56:12  4 of 4 PASS unique_my_second_dbt_model_id ...................................... [PASS in 0.01s]
00:56:12
00:56:12  Finished running 4 tests in 0.15s.
00:56:12
00:56:12  Completed with 1 error and 0 warnings:
00:56:12
00:56:12  Failure in test not_null_my_first_dbt_model_id (models/example/schema.yml)
00:56:12	Got 1 result, configured to fail if != 0
00:56:12
00:56:12	compiled SQL at target/compiled/my_project/models/example/schema.yml/not_null_my_first_dbt_model_id.sql
00:56:12
00:56:12  Done. PASS=3 WARN=0 ERROR=1 SKIP=0 TOTAL=4
The example purposely includes some passing tests and some that fail. This helps you get the full testing experience in a demo model.
dbt docs
dbt also has a great framework for automating model documentation. This is the part we can use to plug dbt into Airflow.
To generate model docs, run:
$ cd ~/repos/demo/dbt/my_project && dbt docs generate
This last command will generate a file called manifest.json, which we will use in the next section.
Setup Airflow
Open a new terminal. We will use this one exclusively for Airflow.
Location
In ~/repos/demo, create a new folder called airflow by running:
$ mkdir ~/repos/demo/airflowVirtual Environment
Just like with dbt, we need to install Airflow in a virtual environment.
Create a new virtual environment named demo_airflow:
$ pyenv virtualenv 3.10.4 demo_airflow
Let’s make Pyenv Virtualenv automatically activate and deactivate demo_airflow when entering or leaving ~/repos/demo/airflow.
$ cd ~/repos/demo/airflow && pyenv local demo_airflow
Confirm that demo_airflow is the active virtual environment:
$ pyenv versionInstallation
Before we install Airflow, we need to set a Shell environment variable called AIRFLOW_HOME that tells the Airflow installer where to set its home folder:
$ export AIRFLOW_HOME=~/airflow
Let’s continue the installation. To install Airflow, run:
$ pip install "apache-airflow==2.3.2" --constraint
"https://raw.githubusercontent.com/apache/airflow/constraints-2.3.2/constraints-3.10.txt"
Note: Notice the —constraint flag. When installing packages via pip, you can define a list of library version constraints. Airflow uses quite a few libraries, and its list of constraints is very large. For convenience, they make it available via a link.
For more information, consult the official guide to running Airflow locally.
Starting Airflow
Once installed, you can start the Airflow web server, where you can control your DAGs from a clean web UI.
To start the Airflow web server, run:
$ airflow standalone
Note: To stop the Airflow webserver, go to the Airflow terminal and press “ctrl” + “c”. But don’t do this yet!
Now that Airflow is running, you can access the web server. Go to http://localhost:8080 and login. The username and password are printed by logging in the Airflow terminal. It will look like this:
standalone |
standalone | Airflow is ready
standalone | Login with username: admin password: mv6DSE8eEVWpS2Wk
standalone | Airflow Standalone is for development purposes only. Do not use this in production!
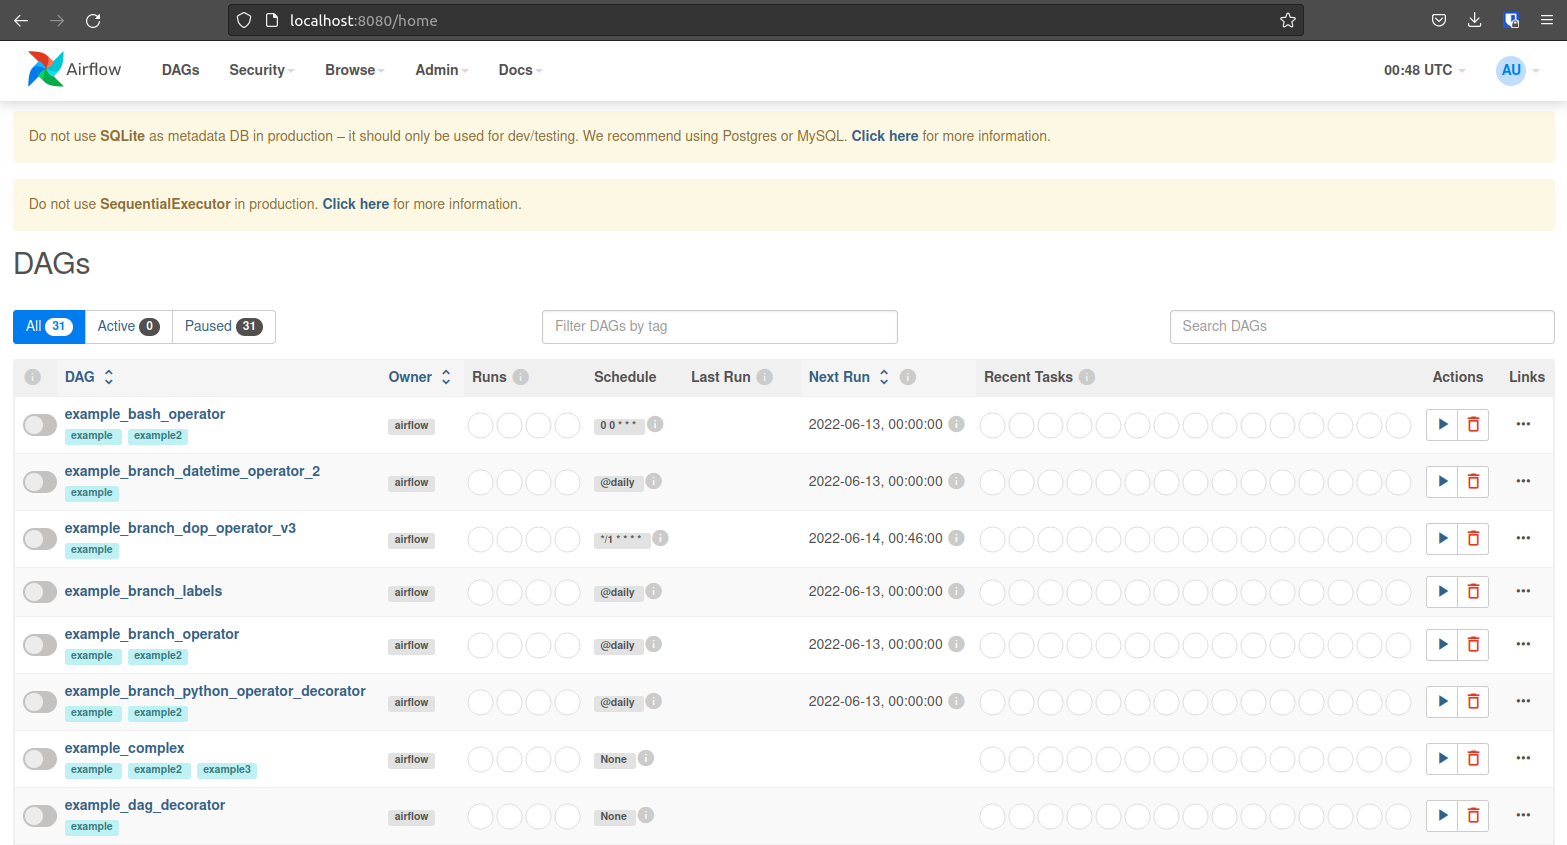
standalone |There are a few example DAGs you can explore that will help familiarize you with the UI. In the next section, we will build a DAG that runs our dbt model one table at a time.
Building the DAG
When you ran dbt docs generate, dbt created manifest.json, among other things. This file is very useful, as it has the name of every model, every test, and the dependency relationships between them! Let’s build a DAG that leverages this file to automate generating all the tasks.
Your Airflow terminal is busy running the web server. Open a new, throwaway terminal.
Remember that, during installation, we set AIRFLOW_HOME = /airflow. Airflow will look in /airflow/dags for new DAG files. Create the dags folder if it doesn’t already exist:
$ mkdir ~/airflow/dags
Now let’s make our DAG file:
cat  ~/airflow/dags/dbt_example.py
import os
import json
import pendulum
from airflow import DAG
from airflow.operators.bash import BashOperator

HOME = os.environ["HOME"] # retrieve the location of your home folder
dbt_path = os.path.join(HOME, "repos/demo/dbt/my_project") # path to your dbt project
manifest_path = os.path.join(dbt_path, "target/manifest.json") # path to manifest.json

with open(manifest_path) as f: # Open manifest.json
  manifest = json.load(f) # Load its contents into a Python Dictionary
  nodes = manifest["nodes"] # Extract just the nodes

# Build an Airflow DAG
with DAG(
  dag_id="dbt_example", # The name that shows up in the UI
  start_date=pendulum.today(), # Start date of the DAG
  catchup=False,
) as dag:

  # Create a dict of Operators
  dbt_tasks = dict()
  for node_id, node_info in nodes.items():
      dbt_tasks[node_id] = BashOperator(
          task_id=".".join(
              [
                  node_info["resource_type"],
                  node_info["package_name"],
                  node_info["name"],
              ]
          ),
          bash_command=f"cd {dbt_path}" # Go to the path containing your dbt project
          + ' && eval "\$(pyenv init -)"' # Load Pyenv
          + ' && eval "\$(pyenv virtualenv-init -)"' # Load Pyenv Virtualenv
          + " && pyenv activate demo_dbt" # Activate the dbt virtual environment
          + f" && dbt run --models {node_info['name']}", # run the model!
      )

  # Define relationships between Operators
  for node_id, node_info in nodes.items():
      upstream_nodes = node_info["depends_on"]["nodes"]
      if upstream_nodes:
          for upstream_node in upstream_nodes:
              dbt_tasks[upstream_node] >> dbt_tasks[node_id]

if __name__ == "__main__":
  dag.cli()
EOF
Note: This is all one Shell command!
This program:
- Loads the manifest.json file from dbt into a Python Dictionary.
- Creates an Airflow DAG named dbt_example.
- Creates a task for each “node” (where node is either a model or a test).
- Defines the dependency relationship between nodes.
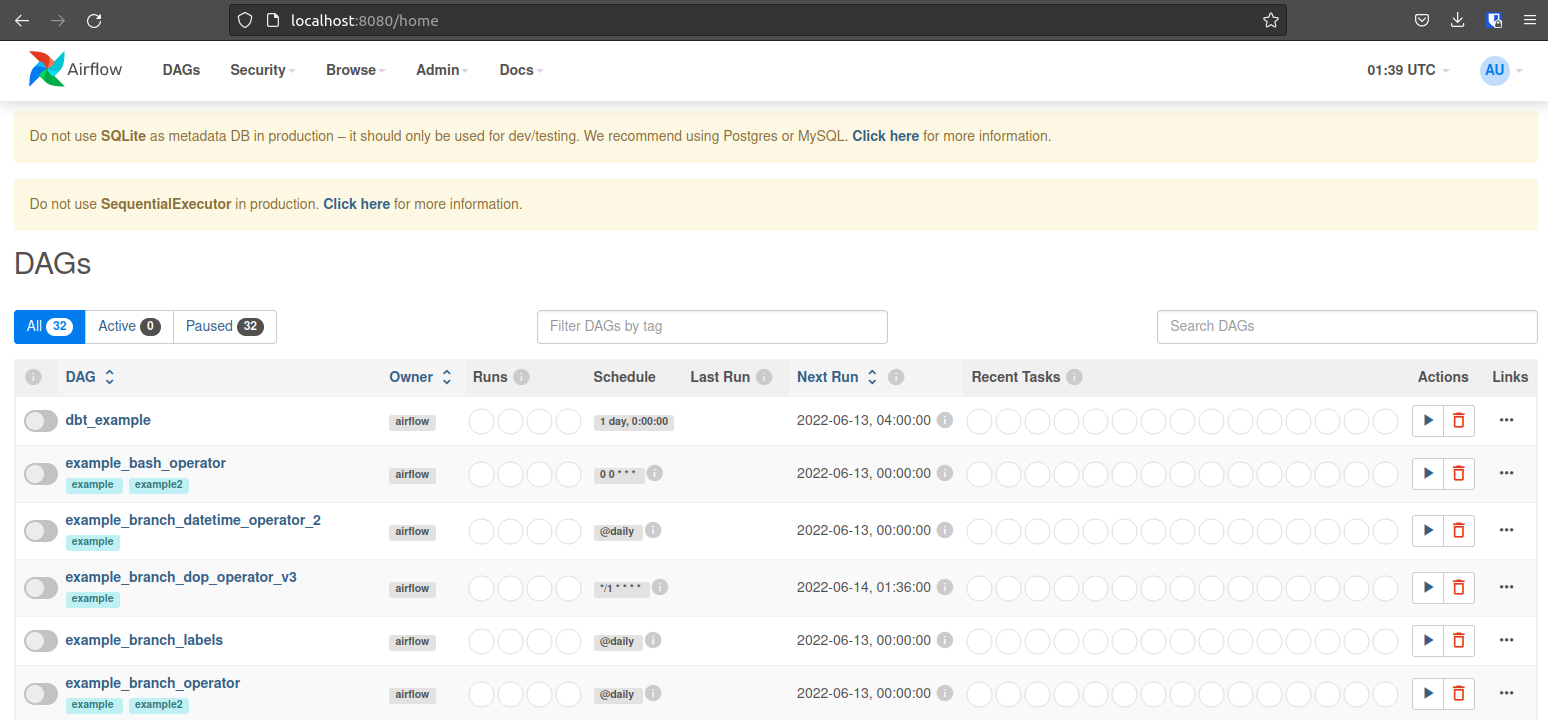
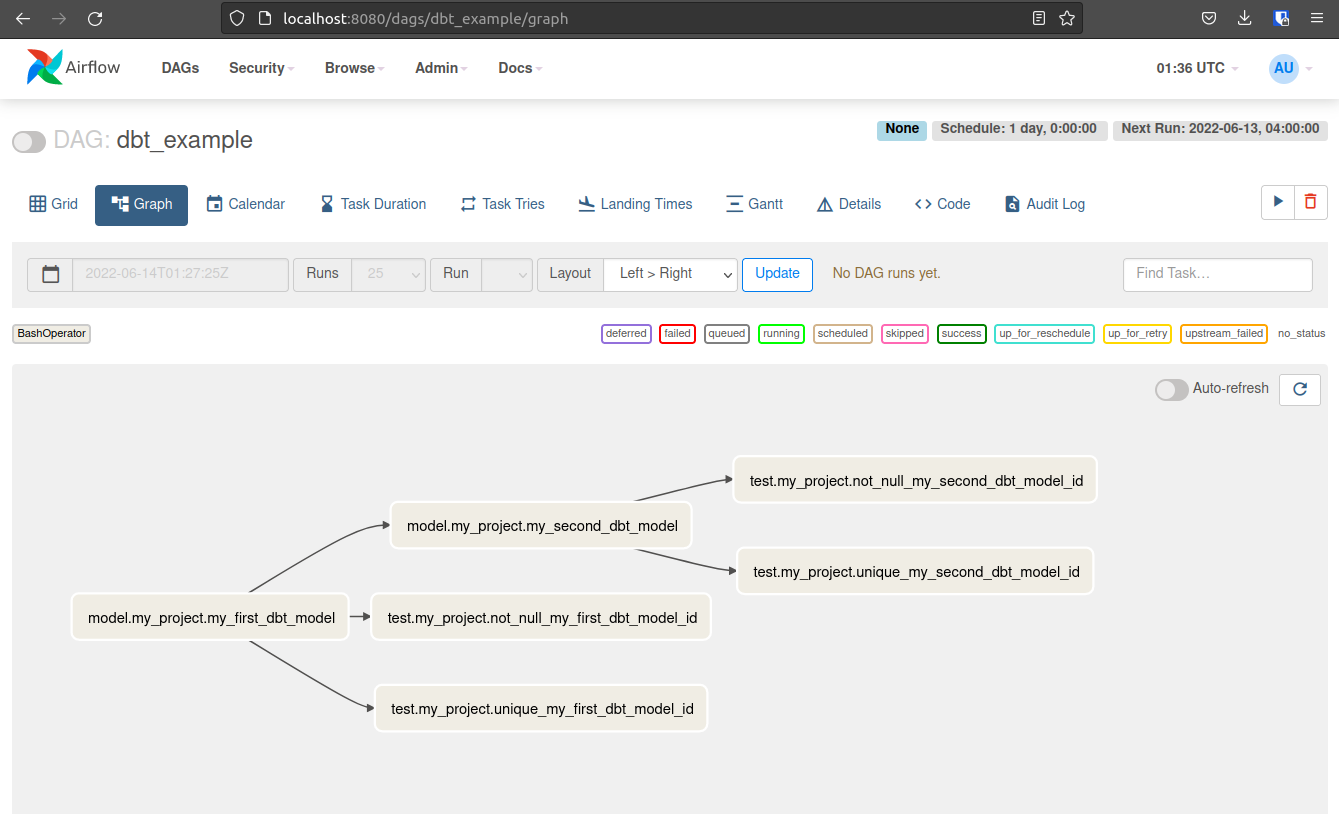
Save the file and wait about 30 seconds. Airflow will find the DAG and load it. When it’s ready, you should see it at the top of your DAG list:
Click on your DAG and select the graph view. Your DAG should look like this!
Editing a dbt Model and running Airflow
We’ve already run our dbt models once and verified that they populated data in Postgres. So that we can verify that our DAG runs properly, let’s edit the dbt models to produce different data.
First, update my_first_dbt_model.sql to have more rows:
cat  ~/repos/demo/dbt/my_project/models/example/my_first_dbt_model.sql
{{ config(materialized='table') }}

with source_data as (

   select 1 as id
   union all
   select null as id
   union all         -- new
   select 2 as id    -- new
   union all         -- new
   select 3 as id    -- new

)

select *
from source_data
EOF
Next, update the filter condition in my_second_dbt_model.sql:
cat  ~/repos/demo/dbt/my_project/models/example/my_second_dbt_model.sql
select *
from {{ ref('my_first_dbt_model') }}
where id is not null -- new
EOF
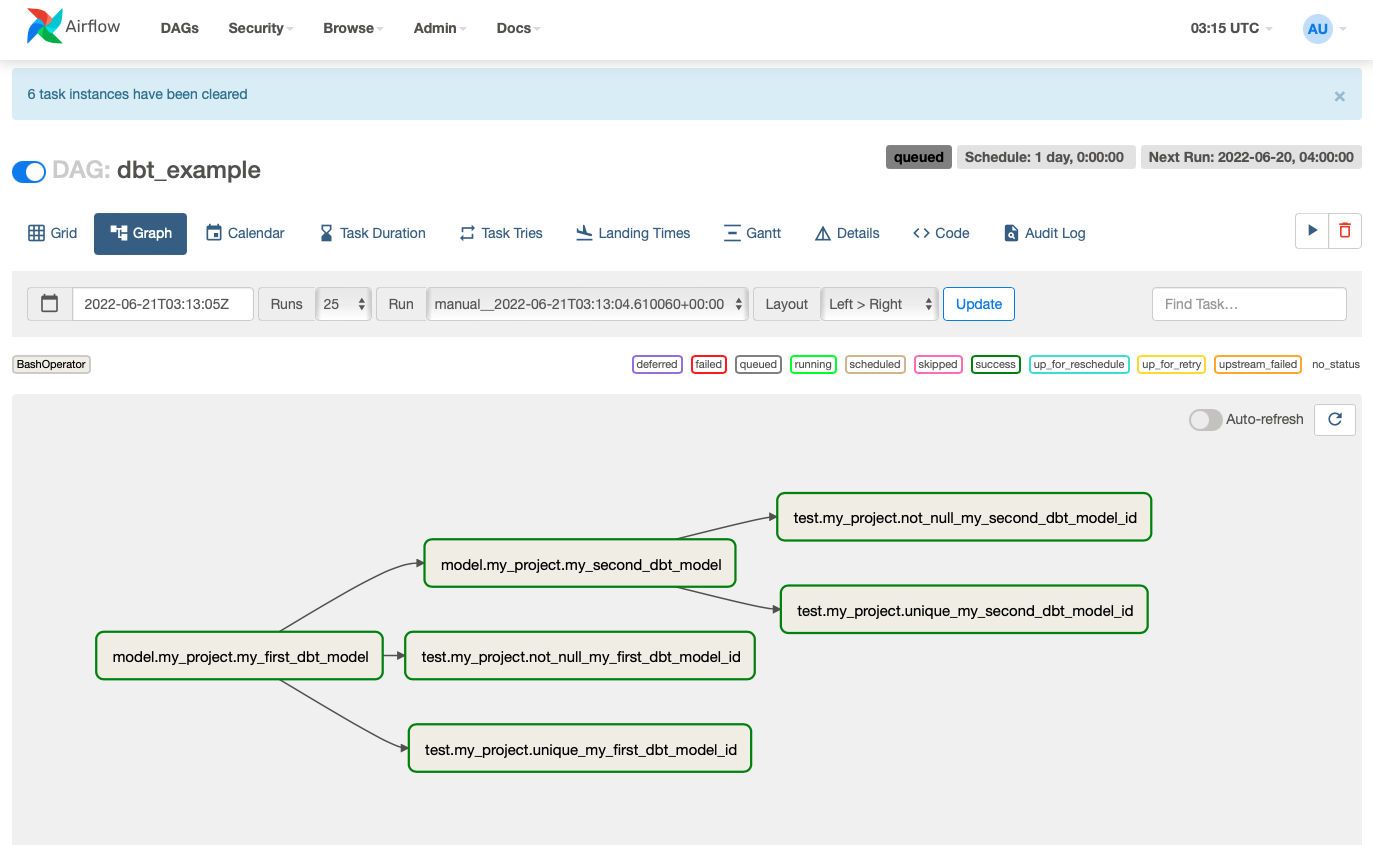
Now, turn on your DAG, enable Auto-refresh, and trigger a run.
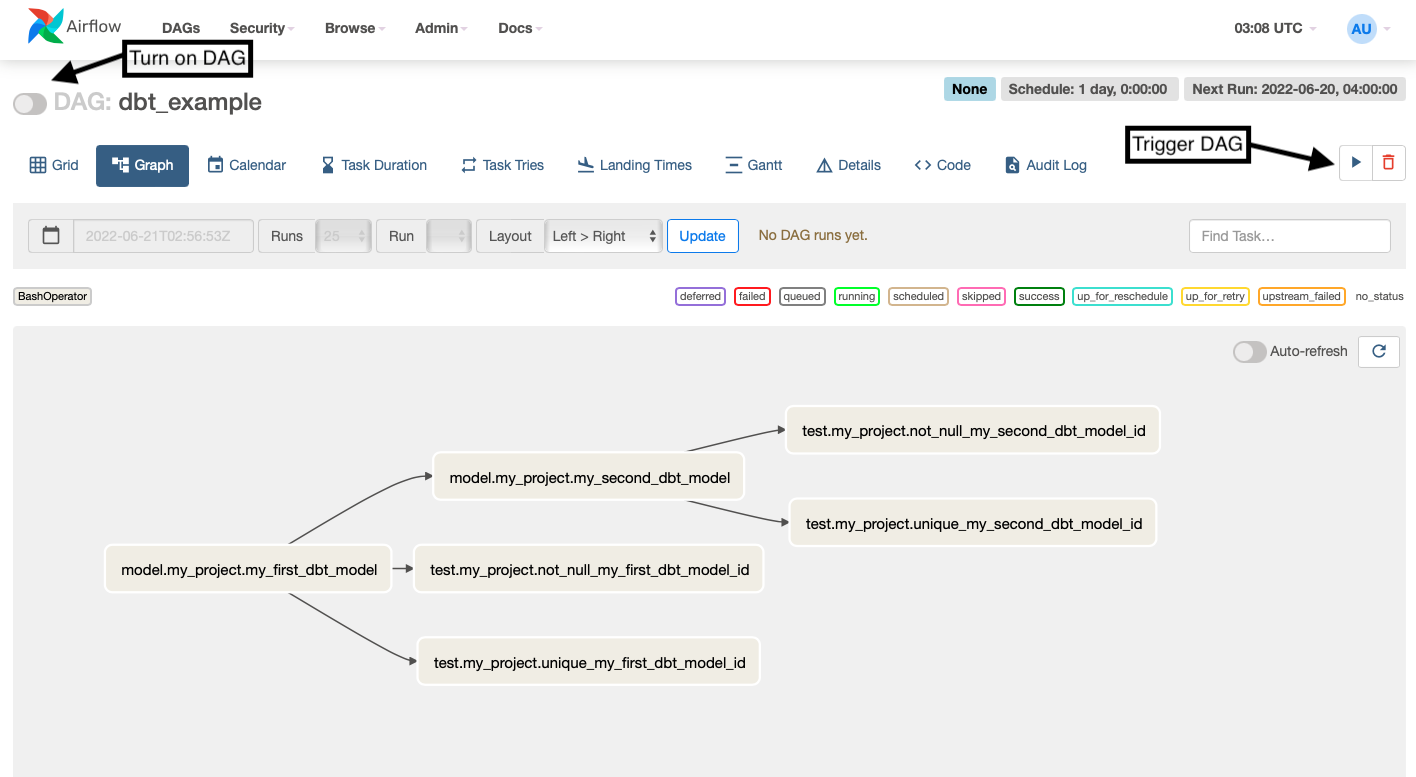
All your tasks should complete successfully and turn green!
Let’s verify that our tables in Postgres changed.
First, check the output for my_first_dbt_model.sql:
$ cd ~/repos/demo/postgres && docker-compose exec dw psql -U dw_user
-d dw -c 'SELECT * FROM dw.dev.my_first_dbt_model;'
Your output should look like this:
 id
----
  1

  2
  3
(4 rows)
Remember, psql displays NULL values as blank by default.
Next, check the output for my_second_dbt_model.sql:
$ cd ~/repos/demo/postgres && docker-compose exec dw psql -U dw_user
-d dw -c 'SELECT * FROM dw.dev.my_second_dbt_model;'
Your output should look like this:
 id
----
  1
  2
  3
(3 rows)
Congratulations! You now have a working demo running dbt with Airflow.