Accelerating dbt core CI/CD with GitHub actions: A step-by-step guide
How we transformed our dbt CI/CD pipeline from a slow, costly process into a lean, efficient system that reduced Snowflake costs by 30%, improved developer productivity, and scaled with our growing team and project complexity.

When I started at Datafold, our dbt project was relatively small and simple, with infrequent changes. Correspondingly, our orchestration and CI was relatively simple. We had a single Github Actions job that would do a full dbt build every morning, on every pull request merge, and on every push. While this might sound terrifying for those running complex dbt projects at scale, this simple orchestration was perfectly adequate for us at the time.
Once Datafold made their first dedicated data hire (me), the volume and frequency of contributions to our dbt project went through the roof. Our single Github Actions job was doing a full build of our project with every pull request I opened, and for each merge. This posed problems: specifically, long feedback loops on CI, and an increased Snowflake bill.
Long running CI jobs are a major annoyance for anyone trying to get even simple changes through. I might have inconsequential changes to syntax, documentation, or formatting, and I’d be stuck twiddling my thumbs while CI spun for minutes. As the project grew, the time for each run increased. Not only was this an annoyance for me, this proved to be a hurdle for broader adoption. As the sole person dedicated to our internal analytics, a clunky developer experience posed a major threat to me convincing anyone else to jump into the repo.
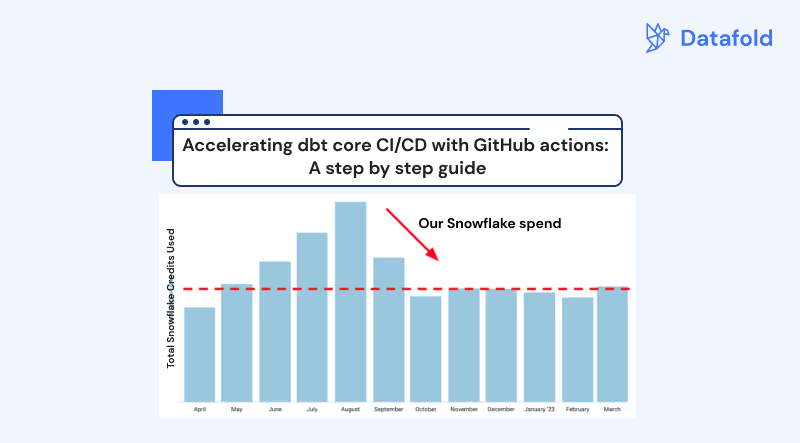
As with most companies in the current economic climate, particularly a scrappy start-up, large Snowflake bills drew the attention of leadership. Our CEO politely asked why our Snowflake bill had doubled over the last few months. In a word, the answer was “me”. At a less data-savvy company, such inquiries might be less diplomatic.
Over the next few weeks and months, we implemented a number of changes to our CI, and our Snowflake bill dropped by over 30%.

By separating our single GitHub Actions job into several discrete purpose-built jobs, we cut down time and cost while improving developer experience and productivity. Our project is bigger than ever, deeply intertwined with sales enablement and customer support, but runs leaner than ever. Rather than running our full project with every change, we now run exactly what’s needed, and nothing more. Our daily production job only refreshes models with new data, our CI job only runs for modified models, and our deploys have actionable Slack alerts.
This article will cover exactly how we improved our CI/CD to speed up run times and trim costs.
Scheduled production dbt job
Every dbt project needs, at minimum, a production job that runs at some interval, typically daily, in order to refresh models with new data.
At its core, our production job runs three main steps that run three commands: a source freshness test, a dbt run, and a dbt test.
As our project matured, we added to this basic framework.
Upload and download production manifest
With each run, dbt generates artifacts that contain detail on the run, including schema detail, performance stats, and other metadata. Included in these artifacts is a manifest, which gives a snapshot of the state of your dbt project, post run. By comparing the latest production manifest to the manifest generated by a subsequent run, we’re able to hone in on exactly which models changed. This is a critical piece of information, and unlocks the ability to drastically streamline performance, in staging, deployment, and even in production.
In order to have this latest production manifest on hand, our production job includes a step to upload the manifest to an Amazon S3 bucket. Other jobs that use the –state selector download this manifest as needed.
Refresh only models with new source data:
The source status method can be used to only run models with fresh data. Our project includes sources that receive new data every few days or weeks, yet we were re-building models downstream of these stale sources every day. Source status compares artifacts from the current and prior run to determine if the max_loaded_at date has changed, and skips sources accordingly.
Exclude views:
Our project includes hundreds of views that we were dropping and creating every day - despite these views being unchanged. By utilizing dbt syntax to exclude view materializations, our production job skips the needless recreation of views every day. Recreating a single view is inexpensive, but as your project grows, the cumulative creation of all your views can eventually represent significant run time.
Exclude static models:
Some models are static, and never change. For example, we have a dim_dates model that contains every date for the next 100 years. Rather than recreating this model every day, we use dbt’s exclude tag syntax to exclude models that we have tagged as “static”. This includes models downstream of static seeds, or static data sources.
Example model config:
Job status notifications in Slack
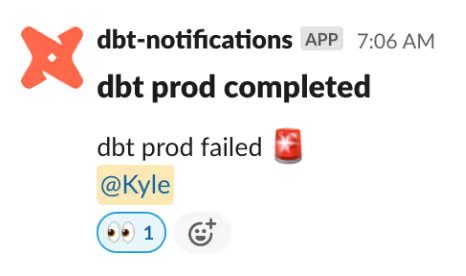
As adoption of the downstream reporting increased, the status of the data warehouse felt more critical, and I began manually checking the status of our daily run job. GitHub will email a notification for jobs that fail, but it’s easy to miss in the sea of other GitHub notifications; I wanted a push notification to actively alert me to the prod job failing.

Borrowing from our engineering team, I set up a simple Slack notification with a binary pass/fail notification. For failures, I added my Slack handle to the notification in order to ping myself should the job crash. If our team grew and there were multiple people responsible for the project, I might revise the ping to alert #analytics-team.

Staging dbt job
Our staging job takes proposed changes to the dbt project, and runs models in a non-production environment. This acts as an integration test, and helps ensure that we’re not introducing breaking changes directly into production.
Set up smart triggers
Our staging dbt job was initially triggered by opening a pull request, and with each subsequent push. As a developer, I sometimes found myself pushing several times to open pull requests, and would cringe as I kicked off a new dbt run with every commit, particularly for minor syntax or formatting fixes.
To prevent unnecessary staging runs, we added a check to not run staging on pull requests marked as a draft. For pull requests where I need to make several commits post opening the PR, I simply mark the PR as a “draft”, push my commits, and when it’s ready for staging, I mark the PR as ready for review to kick off staging.
In a similar vein, I found that if I inadvertently kicked off multiple staging jobs, they would all run in parallel to completion. Rather than allowing an outdated staging job to continue running, we plugged in GitHub’s concurrency feature to cancel in-progress staging jobs. Now, if I kick off staging, notice a syntax error or typo, I can quickly push up a commit, and the in-progress job will automatically cancel, and the new job will run.
Slim CI
Slim CI identifies models with code changes, and only builds modified models. It uses the production manifest to identify unchanged parent models, and cleverly uses production models in place of needlessly running these unchanged models.
In short, Slim CI only runs models impacted by your code changes, and nothing else! This is a tremendous time and cost saver, and is likely the most impactful change we made to our CI/CD.
Staging environments for each pull request
In its first iteration, our staging job created dbt models in a single shared STAGING schema. This worked for a slow moving, one person team, but the second we had multiple open pull requests, either from me or other contributors, our single staging space no longer scaled. The staging environment would be overwritten with each run, and did not tie to a given pull request.
To solve for this, we implemented a process of creating a schema for each pull request, and staging models there. This gives us a controlled spot for each pull request to test changes, and allows for contributors to work in parallel without stepping on toes.
First, we grab the current pull request like so:
When we do a dbt build, we define the pull request schema like so:
Deploy dbt job
Our deploy job is triggered by merges into production, and shepherds new code out into the wild.
Slim Deploy
Similar to our staging job, our deployment job only runs modified models and anything downstream.
This allows changes to immediately be put to use, without the need to do a full production build. Multiple changes can be deployed per day, as needed, quickly and inexpensively.
Disclaimer: this will result in some of your models being “fresher” than others, and could be troublesome for stakeholders comparing stale vs fresh models. For us, the benefit of having changes immediately available outweighs the downside of models being out of sync by a few hours, but that might not be true for every business. The models will be brought into alignment by the next daily production run.
Staging teardown
Staging schemas can quickly clutter your data warehouse, both in terms of taking up space and being a visual eyesore.
Conclusion
For those daunted by the task of managing your own CI/CD, dbt Cloud offers many of these features out of the box.
For the bold willing to self-manage their dbt project, GitHub Actions offers a relatively approachable way to achieve near feature parity, with even more flexibility. Implementing the changes implemented in this article have been a game changer for our dbt project, and hopefully can improve your project as well!
Here’s our complete GitHub Actions jobs:
Prod:
Staging:
Deploy:

.avif)


