
Building your first CI pipeline for your dbt project


Implementing CI (continuous integration) for data projects is not unlike most home renovations: it won’t happen overnight, and the prospect of starting can be overwhelmingly intimidating. But the increasing importance of data quality has turned up the pressure on data teams to adopt CI practices.
If you’re wondering where to start, we’re here to outline a roadmap towards understanding how CI fits into your data pipelines, and share some quick wins that you can actually implement today and share with your team to kickstart your CI journey.
What is continuous integration?
Continuous integration is a software development process that revolves around rigorously checking code changes automatically and before they are deployed to production.
What is CI for data?
In data, CI means something related but distinct: exhaustively validating changes to data and data pipelines to maintain data integrity and avoid data regressions.
For data teams using dbt, CI is all about preventing untested or bad data from entering production and impacting business operations. A rigorous CI process leverages distinct data environments for development, staging, and production.
CI as critical checkpoints for data teams
Imagine you work for an e-commerce company, and your data infrastructure supports real-time product recommendations for website visitors. The recommendation engine relies on up-to-date and accurate data about customer preferences and product availability to make personalized suggestions.
Now, consider this: in your development environment, where data engineers craft and refine data transformations, a mistake appears in the data transformation process which incorrectly flags certain products as "out of stock." If left unchecked and directly pushed to production, it could lead the recommendation engine that relies on production analytics data to exclude these products from suggestions, even though they are actually available.
CI helps prevent this. Rather than pushing code changes straight to production, changes are pushed to the staging environment. This staging environment mirrors the production setup as closely as possible, and gives you a chance to “break the data” without breaking production and impacting the business.
Here’s what a CI process for a data team would look like:
- In the development environment, when the bug first surfaces, it can be identified and fixed by data engineers. But if it’s not caught in development …
- Before code changes are merged into the production environment, they are promoted to the staging environment. Thanks to automated tests that run in the end-to-end data pipeline that runs in staging, they catch the bug that incorrectly labels products as "out of stock" and correct it.
- Only after successful testing and validation in the staging environment is the corrected code deployed to production.
The staging environment acts as a critical checkpoint, preventing bad data and bugs from infiltrating your recommendation engine's learning process.
Does your dbt project need CI?
We’ve previously made the case for why you should care about CI. If you’re still not sure, consider whether you’ve asked these 5 questions lately when shipping new dbt code:
- How will this change impact our data pipeline performance?
- What are the important downstream data app dependencies that will be impacted by my code changes?
- Does this change adhere to our coding or data quality standards?
- What's the expected behavior when handling missing or erroneous data?
- Do all the PRs submitted undergo the same testing and review process?
If you answered yes to any of these, it’s time to think about building a CI pipeline.
In the next section, we’ll walk through the fundamentals and show you how to build a CI pipeline for your dbt project.

It’s ok to start small
A CI configuration can be as simple as ensuring your dbt models compile, or as complex as orchestrating an intricate data testing and validation process.
For example, at the most basic level, your CI configuration might involve simply building dbt models and running dbt tests. This basic setup ensures that your data transformations build properly and at least pass foundational checks, minimizing the chances of deploying dbt code that will fail in production.
In a more complex CI configuration, you could employ a comprehensive suite of tests that cover various aspects of your data pipeline. For instance, you might include SQL linters to enforce consistent coding standards, extensive unit tests to validate complex logic, and data diffing tools like Datafold to identify nuanced changes in your data, such as unexpected row-, column-, and value-level changes.
Here’s how the anatomy of your CI pipeline should look, covering both basic (fundamental) and advanced techniques:
Building a very basic CI pipeline
Let’s go over the foundational components of a basic CI pipeline through GitHub Actions that you can get up and running for your dbt project in an afternoon. Keep in mind that CI pipelines can be highly customized to align with your team’s specific requirements, so feel free to adapt this framework accordingly.
By the end of this section, you will see a CI pipeline that will, upon a new PR being opened in your dbt project:
- Ensure your dbt models compile and build properly
- Test your dbt models with the tests you’ve established for them
- Run a SQL linter against your code changes
Note: This example here is using a dbt Core project, but for dbt Cloud projects, setting up a CI process is pretty painless. Check out this blog on how to do that.
To follow along, check out the GitHub repository here.
Set up the YAML file
GitHub Actions helps automate tasks and workflows that include managing and processing data. You can create automated processes for tasks that manage and process data based on events that trigger workflows.
You need to first create a YAML file in your .github/workflows directory (typically named something like dbt-pr-ci-job.yml) to define your CI/CD workflow. This file will specify the steps and configurations for your pipeline.
Here, you can give your pipeline a name, and on specifies when the workflow should run.
In this example, it runs every time a new pull request is opened, but you can change this to run at other times. We also specify with !main that we don’t want our CI checks to run when pushing to the main branch.
It’s common to see dbt projects with multiple workflow files that run different dbt model builds and data quality checks at different stages (e.g., during development and during deployment). You can start simple, but the sky's the limit!
📚 YAML files use indentation and a clear, concise syntax that makes them easy for humans to read and write. It's important to note that indentation in YAML is very strict; if elements are not properly indented, the YAML file is likely to encounter errors and won't run correctly. YAML is often used for configuration files (e.g., setting up CI/CD pipelines) and data exchange between languages with different data structures. You’ll see YAML files throughout your dbt project for package maintenance, tests, documentation, and more.
Add steps to the workflow
We’ll first need to set up the necessary environment for our workflow in a job. Jobs define what will be executed and in which order. Under jobs, we list the steps needed. Steps are the individual actions your CI/CD pipeline will perform. We will be adding multiple steps based on our requirements.
The steps below configure Python versions, install required Python packages, and check their versions. These actions ensure your pipeline runs in the right environment and has access to the required tools. Our requirements.txt file is pretty simple as we only need to install the dbt-snowflake adapter and our linter, SQLFluff.
Defining dbt commands and environment variables
Then, you’ll need to add steps for dbt commands you want to run. Most projects include running dbt deps to install project dependencies, dbt run to build your dbt project, and dbt test to run tests against your dbt models. You can alternatively use the dbt build command to compile, build, and test your dbt models in one command.
In dbt Core, you have to specify the directory where dbt should look for the profiles.yml file. For dbt Cloud users, environments are set within the dbt Cloud UI.
We also added environment variables here. Environment variables are dynamic values that store critical configuration data, such as database connection details or sensitive credentials. You can do this in GitHub Actions by clicking on the repository’s Settings to find the Secrets and variables options where you can add secrets via the New repository secrets button.
In the example above, we’re building all of our models in our dbt project by default for simplicity purposes. More often than not, however, you don't need (or want) to build all of your dbt models, and only want to build and test the ones you're modifying in your PR. You can read more here on how to upload your dbt project's manifest.json to S3 to run only modified models during your CI process.
For a more streamlined approach, known as “Slim CI”, you can utilize dbt Cloud to manage and compare against the necessary artifacts (dbt-generated information on each dbt run e.g., schema details). As this can be a challenging process for larger-scale data organizations, check out our approach to setting up Slim CI in dbt Cloud.
🏅Extra credit: Linting your code
If you made it this far, consider adding a step for SQL linting using a tool like SQLFluff to automate SQL code quality and consistency. It helps identify and prevent common SQL errors and stylistic issues, ensuring that your SQL code is readable, maintainable, and less prone to errors when executed in your data pipeline. It also allows you to specify syntax and formats that work for your team, so new code changes adhere to your team’s practices.
To implement SQL linting, add SQLFluff to your requirements.txt file so it gets installed, and add a .sqlfluff file in your directory to specify your SQL dialect and any exclusion rules:
Then, add the step in your CI workflow:
Now, whenever a new PR is opened for your dbt project, the following will automatically happen:
- Python will be installed
- Your dbt version will be installed
- Your dbt models will be compiled, built, and tested
- A SQL linter will run against your new code
These are all things that can be done manually, of course. But when you add these checks to your CI process, you’re ensuring every single PR undergoes the same testing process, and that corners cut or differing individual interpretations of data quality don't lead to production errors or inconsistent practices.
Set it up in GitHub Actions
To get started on upgrading your own repositories, you can check out our demo dbt project here that uses data and models from dbt’s jaffle shop example. Our demo project includes the .github folder with the dbt-pr-ci-job.yml file and the .sqlfluff configuration file. Remember to update your requirements.txt file to include SQLFluff and any other dependencies.
To test it out, create a pull request, which will trigger the workflow automatically. After a few seconds or minutes, head to the Actions tab to check on the workflow’s status:
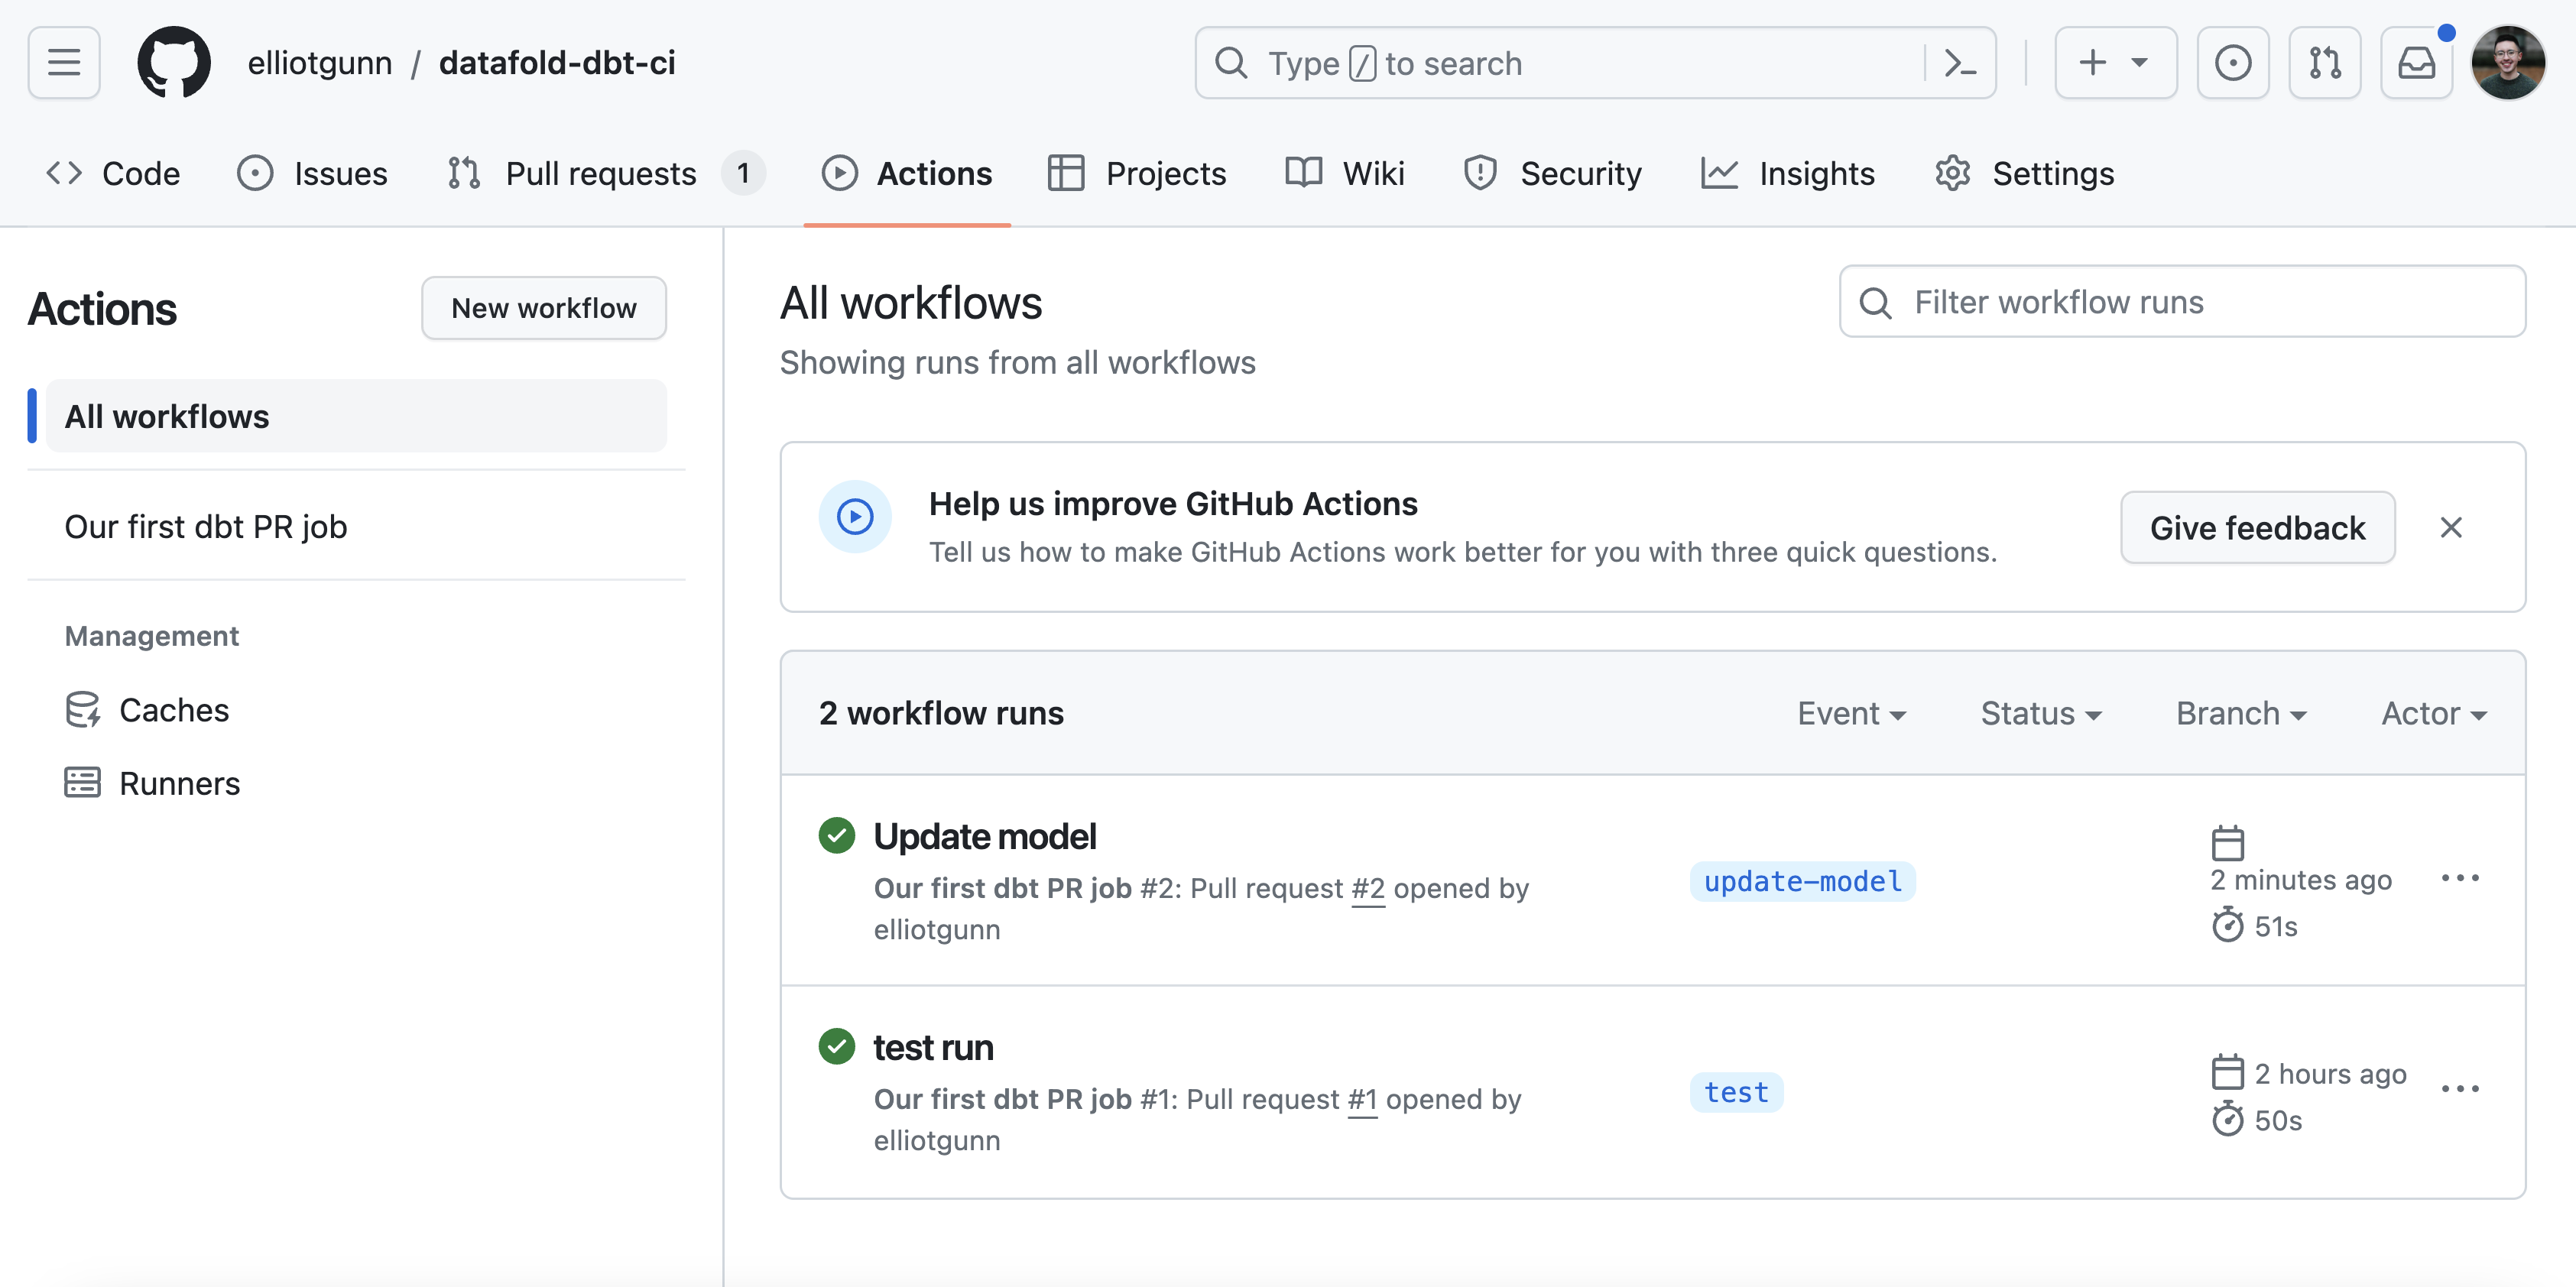
In our example, the green checkmark means our workflow completed without any errors! (If you’re just starting out, it may take a few tries to troubleshoot errors before you see success.) We’ve successfully set up a basic CI/CD pipeline for your dbt project, and it only took an afternoon to lay important groundwork to ensure that your team’s PRs are error-free and consistently tested.
In the next article, we’ll take a step further and show how you can add more advanced features such as dbt post-hooks and data diffs to validate data quality, and add automated notifications through Slack.
What should your CI data pipeline look like?
If you want to know what this means for your team and how Datafold can help, there are a few ways to start:
- Set up a free CI consultation to talk about what CI setup makes sense for your specific data environment and infrastructure
- If you’re ready to start working on building CI for data, we have a free trial experience of Datafold Cloud, so you can start connecting your databases as soon as today
Datafold is the fastest way to validate dbt model changes during development, deployment & migrations. Datafold allows data engineers to audit their work in minutes without writing tests or custom queries. Integrated into CI, Datafold enables data teams to deploy with full confidence, ship faster, and leave tedious QA and firefighting behind.