
Best practices for using dbt with Snowflake


dbt and Snowflake are not only two of the most popular modern data stack tools, but they are the most powerful when used correctly. They also happen to be two of my favorite tools to use together. Both contain features that allow you to truly customize your data warehouse and data models, ensuring that they operate seamlessly together.
In this article, we’ll take a look at a bunch of different ways to get the most out of your dbt + Snowflake setup:
- Creating targets and using environment variables
- Using 0-copy clones
- Utilizing a shared staging database
- Creating a dbt_user with specific permissions
- Keeping an eye on query and storage costs
- Using dynamic masking for PII
Creating targets and using environment variables
When defining your development and production targets within dbt, I recommend selecting two different databases:
- I like to use a database called data_mart_dev for my development target, and
- One called data_mart_prod for my production target
This allows you to keep the integrity of your schema structure in dbt across different databases without having to change too many configurations. When keeping the schemas the same across databases (or different targets), you can ensure your development environment exactly mimics that of production.
Here’s an example of how I separate out my development and production targets in dbt’s profiles.yml using two different Snowflake databases.
Notice how each target has a different database, but the schemas are defined in the same way. We can then define different schemas for our project structure later in the dbt_project.yml file. This exact structure will be built out in each database within Snowflake, with minimal configuration:
When building out an intermediate model, the model will be built in Snowflake’s data_mart_dev.intermediate when using the dev target and Snowflake’s data_mart_prod.intermediate when using the prod target.
Creating an efficient developer environment with 0-copy clones
0-copy clones allow you to copy a data table without duplicating the underlying data. Instead of copying the data, the clone shares the same structure and qualities as the original table, making it faster and less resource-intensive. These are great for testing dbt data models in development without sacrificing performance on the original table.
You can create clones within your dbt project using the dbt-snowflake-utils package. After adding the package to packages.yml, you can run the following command within your dbt environment:
This command is a built-out macro that clone your data_mart_prod database and name it data_mart_prod_clone while giving the role that executed the command full access to it. You can run this directly within dbt core or even as a step in one of your jobs in dbt cloud.
The Montreal Analytics team who developed this package gives a great visual of what this architecture may look like within your Snowflake data warehouse.
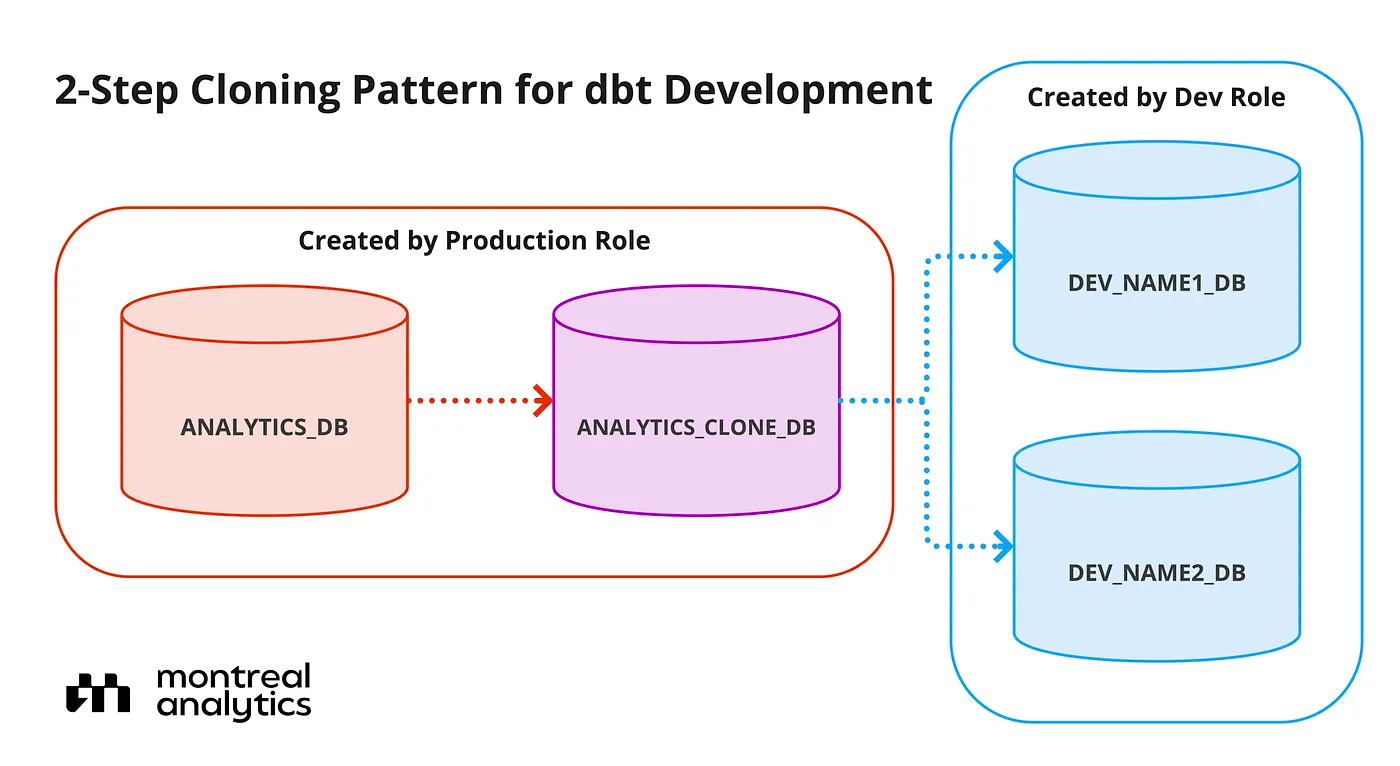
There is also an optional parameter '''new_owner_role''' that allows you to change the role of who owns the cloned database in Snowflake. By default, the owner of the database is the role that executes the command. This would be great to use in a situation where you want to give a development role access to a production database that was cloned for testing purposes.
Create a shared staging database instead of a staging schema
In addition to data_mart_dev and data_mart_prod, I recommend creating a shared staging database to be used in both development and production. Because staging models exist as views, they are simply referencing the underlying raw data.
Staging models are simple castings or renamings on this raw data rather than complex joins or aggregate functions. Because the raw data is essentially staying the same, with some minor improvements, it doesn’t make sense to create these views in two different locations. Once these models are created once, they rarely ever change unless it’s to add or remove a column. With them existing in one place relatively untouched, you are saving computing and storage costs.
Another reason to separate staging models into their own database relates to the schema structure we showed above. If staging models are included in data_mart_dev and data_mart_prod, each source name wouldn’t be able to exist as its own schema. Instead, you would have to create a separate schema for staging and then store all staging models within that one schema, making it difficult to find data by source.
It would look something like this:
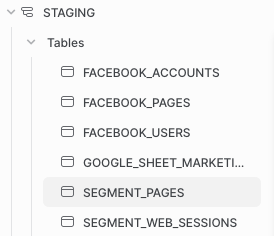
While this may not look awful with only a few sources and tables, imagine having hundreds of sources AND tables. It would make it much more difficult for you to find the data source you are looking for.
Instead, your database can look something like this:
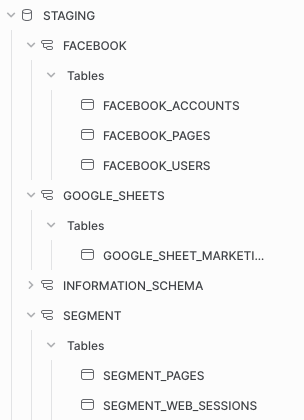
This type of organization will make finding a table you need quick and seamless, especially for those less familiar with the data warehouse, like the data analyst.
Creating a dbt_user with specific Snowflake permissions
When using any type of data warehouse and external tool, it is imperative that you have tight access control. Luckily, Snowflake makes it easy to create users and roles and assign them specific permissions. I recommend creating dbt users specific to production and development. If you have multiple people using dbt, each person should have their own user to access the development environment. However, there should only ever be one production user.
Development users should only ever have access to the staging database and data_mart_dev. This way, it is impossible to write any development data models toproduction. Your production user should only have access to the staging database as well as data_mart_prod.
Both users should only have read access to the database where your raw data is stored. Users in Snowflake should only ever be reading from a raw database to creating staging models, never writing the results of specific queries. For this raw database, only your data ingestion tool should have write access. A good rule of thumb is to follow the principle of least privilege (POLP) and give users/tools only the minimal privileges needed to do their jobs.
In order to create a development role with read and write permissions on all tables and schemas within data_mart_dev, you can run the following commands in Snowflake:
For a production role, you would run the same commands but swap data_mart_dev out for data_mart_prod.
In order to control access within Snowflake without manual intervention, you can also implement permissions as code. This involves defining the permissions mentioned above directly within a version-controlled codebase and automatically deploying them to the dev or prod environment. This approach helps you manage your access directly alongside your infrastructure code, creating a single source of truth for your data environment.
This is commonly done using a Python-based tool called Permifrost. Permifrost enforces version control for your Snowflake permissions, ensuring users review and approve changes before they are made. Using this tool you can also set strict security permissions that users may overlook, such as the number of users who are given sysadmin privileges.
Code for giving dbt_user select permissions to the core schema in data_mart_dev may look something like this:

Keep an eye on costs
If you’ve used Snowflake before, then you know how easy it is to pile up costs for running warehouses. While there are a few different tools you can use to control these costs, it’s often hard to monitor them using only the Snowflake UI. Luckily, there are multiple open-source packages for dbt and Snowflake that track how much you are spending in Snowflake by looking at cost per credit and cost per query.
The first package, snowflake_spend, is one that calculates the cost per credit in your Snowflake environment. For this package, in addition to including it in your packages.yml, you need to enable it in your dbt_project.yml. You then run it like you would a seed file. It generates a CSV file with the date and the rate you are paying, allowing you to track how this changes over time.
The second package, dbt_snowflake_monitoring, calculates the cost per query being run in your Snowflake environment. This can help you identify your most expensive queries, allowing you to optimize them to reduce your costs. You can read more about the method that is used for this here.
In addition to implementing monitoring packages, you can also take advantage of the different model materializations that dbt offers. dbt is known for its incremental models, which allow you to only run data models on newly created or updated data, appending the output to the previous output that was run. Avoiding recalculating your entire table every run will make your runs faster and much more cost efficient.
To make a model incremental, you add a config block to its SQL file and a filter that specifies the column that closely represents when a data row was generated.
Here, created_at is used as the timestamp column to compare when data was last transformed within this model. dbt will only run this query on rows that have a created_at timestamp greater than the timestamp currently stored in the resulting table.
Utilize dynamic data masking on PII fields
If your data warehouse contains PII, it is important that you hide this data from Snowflake users. Snowflake offers a lot of control with security features like data masking, and dbt allows you to automate them. One of the benefits of controlling data masking through dbt is that dbt is still able to access the data it needs while hiding visible fields within the warehouse.
dbt offers a package called dbt_snow_mask which allows you to automatically apply Snowflake data masking policies on columns within your data models as they are built. You can define these masking policies as a macro within dbt, typically called create_masking_policy_<policy_name>.sql. Your SQL file for the policy may look something like this:
Once you define this masking policy, you can then define it on a column within the YAML file for your source or model, like so:
Now, rather than having to manually apply this policy to all PII data that comes through your data warehouse, you can automate the policy through your dbt project. Not only does this save the time and effort of your data team, but it ensures you are always maintaining the best security practices. There will never be a lag between data ingestion and securing PII data!
Datafold is the fastest way to validate dbt model changes during development, deployment & migrations. Datafold allows data engineers to audit their work in minutes without writing tests or custom queries. Integrated into CI, Datafold enables data teams to deploy with full confidence, ship faster, and leave tedious QA and firefighting behind.